Our House

Our House

Monday, September 30, 2013

Changing Exterior Lights for $1

We have basic tarnished gold exterior lights at our house. They aren't anything exciting and are not the shape I would pick if I could choose. But changing them out is not a cost or project that I want to take on right now. Soo I decided to paint them...I mean, I paint everything else, right? Now I have seen various people use spray paint but that would require protecting a lot of surfaces or taking the light off the house as I am a very messy painter. Instead, I went to the craft store and found some metallic craft paint. It was Martha Stewart's metallic multi-surface acrylic craft paint. I had a coupon so it was about a $1. I used one bottle for two lights.


So this is an easy project but kind of boring. Which is why it is taking me so long to actually finish all of the lights. I did one last year and one a couple months ago and I still have some more to do. I just used a small paint brush and put on three thin coats. I had to stand on a stool and my weak arms got tired haha. I did listen to music put it took over an hour for one light. Which isn't really bad. 

And here is a before and after.

Now I don't think this paint was meant for this project or outside...However I will stay it is still in perfect condition. The one I did last year is under the porch so it is more protected from the elements. The one I did three months ago is out in the open and still looks like new. So I don't expect the paint to stay perfect for years but for a $1 update I will take whatever I can get. 

Friday, September 27, 2013

From Trash to Treasure-Dresser

One night while driving home from work after dark I saw a dresser in someone's trash...I backed up the car and checked it out. Then dragged my husband out of the house to help me put it in the car. Here is the beauty.


It was painted different colors on different sides...And it had obviously been painted a couple times. I found some green on there. The top was also textured and there were no knobs. But I liked the unique size and UM it was FREE.

I decided to make this dresser match my first dresser that I made over. First I sanded down the weird texture on the top. I normally wouldn't prime since it was already painted but since it was kinda a hot mess I just primed over the whole thing with my oil based primer. Primer was also a must due to the dark color I needed to cover up. I used a roller for the primer and then sanded. I ended up just using a good paint brush for the paint coat. It was just easier and the piece isn't that big. I used the leftover paint I had from my other dresser. 

I wanted to do a stencil but not the same chevron one that I did before. I found a quatrefoil stencil for free online and I used my method of tracing it right off the computer screen and then cutting out the stencil...Tracing it on the dresser drawers took a long time. And then doing two coats with a tiny brush took forever. But it was so worth it. Afterwards I also used the same glaze that I used for my table to distress the dresser. Since it wasn't in good shape underneath the paint I didn't want to just sand it down to distress.

I did have to buy knobs but the knobs were a total of $20 which was my only cost for the dresser. And here are the beautiful after pictures!


I normally don't paint the inside of drawers but they had some over-spray from old green spray paint. I painted the sides and then I used some scrapbook paper that I already had and mod podged it on the bottom of the drawers. I think it makes for a fun surprise. 

I think the dresser looked great in our room and with the other dresser. However after a couple months I decided that we didn't really need it. We already have two large dressers so did not need this small one. I ended up just selling it on Craigslist. It was hard to let it go but someone else who actually needs it can enjoy it now. I might have cried. But I had fun making it and I still have the stencil if I want to use it again. 

Wednesday, September 25, 2013

Quick Chair Update

My grandmother gave me two outdoor chairs when we first moved into our house so we could have some extra seating on the deck. They needed an update but I just got around to it last month. I bought three cans of exterior spray paint for a change that took half hour.

I first sanded down the rust and dirt on the chair. Once they were clean I just did a couple light coats of spray paint. They are a solid color for now but I may add some stripes later. The two chairs are now on the front porch with my stenciled bench.

Tuesday, September 24, 2013

Stenciled Bench

I was gifted this wooden bench a couple months ago. I primed it and then it sat for a while because I wasn't sure where I wanted to use it. I finally decided to put it on the front porch. I painted it white but then wanted to do something else to brighten it up. 


I decided to use some of the leftover paint from our front door. At first I tried a stencil on the seat with a patterned piece of paper...that didn't work so I wiped it right off. So then I went on Pinterest and found this tutorial from House Tweaking. Since a toilet paper roll is something that I had laying around and required no money I decided to give it a go. I just dipped it right into the quart of paint.

My circles are mostly straight and some have more paint than others. About halfway through, the toilet paper roll started coming apart so I just switched to the other side. I think it looks pretty good considering it was free and the stenciling took less than half an hour!


Monday, September 23, 2013

Front Door: From Blah to Bright

When we first moved into our house all of the exterior doors, trim, and shutters were all painted the same blue. Blue is my favorite color but not this blue...it was also very faded. I thought about painting the front door for almost two years and we finally did it this past spring. Once we did I couldn't believe we waited so long. It did take a while to decide a color. We talked about various blues, yellows, and teals. In the end we ended up walking into the store and just picking a color without even sampling it! It is bright and fun and if we get sick of it it will be a quick fix to change. 


We picked "Caribbean Sea" by Glidden. It is the high gloss exterior/interior paint. One quart was about $11. My husband volunteered to do the paint job as he is more of a perfectionist than myself and the front door is the first thing you see after all. 
By the way, I don't love this door. But it is the door we have and there is nothing wrong with it. One thing I didn't like was the yellow plastic around the glass so I primed that with oil based primer and then Pascal painted it the same color as the door. It helps to make the gold in the glass less offensive.
Pascal cut in with a brush first and then rolled with a small foam brush. It took two coats. He started in the morning so we could keep the door open all day. 


In  addition to painting the door we also bought new door knobs to replace the old gold ones. There are so many beautiful options but I went the cheap route for now...I found a basic brushed stainless steel doorknob set from Lowe's for $30. And it came with two! So we can replace the ones on our back door too.

We also bought a vinyl sticker to add our house number to the door. I was inspired by several pictures on Pinterest like this one. And I wanted to take down the small brass numbers on our porch post that are barely visible from the street anyways. 

I searched Etsy and there were a lot of options. I made the mistake of not paying more attention  to measurements and the first one I ordered was too small...So then I found one from a different company and ordered the right size for only $6! I thought this was a really good price for a large 5 digit house number and cheaper than other shops.  It came quickly and had detailed instructions for application. Since I don't want to show a picture of our actual house numbers here is a picture from the Etsy store TM Decals where I bought mine.You can pick different fonts and colors but I just went with white.

Photo Credit TM Decals
And here is an after picture of my door...With a piece of paper to cover the number because I am better at using tape than a computer to edit the number out.


Now I just need to update the storm door...oh and of course the siding.

Friday, September 20, 2013

Colorful 5K

Apparently getting paint all over myself at home is not enough...So I finally did one of the color runs that are very in right now. There are a couple different ones but that one I did was the Color In Motion 5K. Now the "color" part of the run is actually dyed cornstarch that gets thrown at you by race staff and other race participants.

It was my friend Kiersten's idea and I even found a Groupon to help with the cost. My husband and I did it with Kiersten and Jake which definitely made it more fun.

I am not a runner like my dad and I haven't done a 5K since I was 13. But this one was a great one to do because it is a fun run. It is not timed, there were lots of families, and a lot of people walked.

It was a beautiful fall day last weekend in DC and there were a ton of people out for the race. Including a lot of people with fun costumes/outfits. We all wore sunglasses or hats to try to keep the color dust out of our eyes. Kiersten bought us all fun striped socks.


We got there an hour and a half before the race which helped with parking and also in being one of the first waves to start. We were nice and clean when we started.The event gave us the shirts with our registration.


You get a lot of color on you during the race but also after. That is when most people use their color packets that you are given. For the "after party" there was a big crowd, a stage with people dancing, and a DJ.


I brought towels with us for the car on the ride home...Our shirts looked really cool after we were done. And I wanted to keep them that way. The event itself recommends soaking in vinegar, ironing, then washing. However after reading around on the internet it seemed that this was met with limited success by real people. Either the color came out after washing or the colors just looked faded and blended together. So after agonizing over it (this is serious stuff people) I finally decided just to wash them. I didn't add any stain remover or anything. And afterwards....completely clean. There was one blue spot on my shirt so I just sprayed that with Shout and washed again. 


I am sad that I didn't get to preserve the color in the shirts. But at least we have pictures and I think we will probably be more likely to wear the shirts again now then if we tried to keep the color and it just turned brown.

I would recommend doing a color run to anyone and I would do it again!

Thursday, September 19, 2013

Customizing Cork Boards

Cork boards are awesome right? They have so many different uses. I decided to use cork boards as art. I wanted to make some motivational art for my cubicle and when I went to buy a canvas at the craft store I saw the below square cork boards and decided to buy those instead. I believe it was $10 for four at Michaels plus I had a coupon of course.

I found a quote I liked on Pinterest and used stickers to cover up the cork board. I wanted there to be some cork board visible. I then painted over the stickers with a test pot of house paint. It took a couple coats for full coverage so I used craft paint on later projects and that worked better.


Since making the above cork board I have made several as gifts. I like the below one where I taped off the edges with painter's tape. 


I made this one for my mom...I actually got it out of my neighbor's trash and then painted it. I told my mom this as soon as I gave it to her and she was very proud. I traced the letters from my computer screen to paper and then cut them out and traced around them like I did here

My pretty mommy

This is another project that you don't have to be an artist to do! Painting a cork board is a creative way to make art or to actually use as a cork board. 

Wednesday, September 18, 2013

Quick Headboard Update

I am not a huge fan of our current headboard and would like to have something more exciting and possibly make my own. In the mean time I decided to make a quick change. I used a throw blanket that I already had  in the bedroom and threw it over my headboard. It took about 2 minutes and I like it much better now!


Tuesday, September 17, 2013

Bathroom Hardware Update

We have a full bathroom upstairs that right now is the bathroom all of our guests use as the downstairs half bath only functions half of the time. The bathroom has the original blue toilet, tile, and bathtub. It is in pretty good shape so I don't plan on making any major changes. I actually like the vintage blue...


The only change that I have made so far, besides adding some accessories, is to update the hardware. I did this last year and it is still in perfect shape. The doorknob and toilet handle were already oil rubbed bronze so I bought one can of Rustoleum oil rubbed bronze spray paint. I did several light coats and did not even use the whole can so this was a $4 project. The hardware was a mish-mash before. 


And beautiful and shiny now! I let them dry for several days to make sure I didn't mess up any of the paint when I re-installed the hardware (And yes I actually un-installed and re-installed all by myself. Okay well there was one stuck screw I needed help with).


Here is the bathroom today. I hung up some art I already had before we bought this house and that's about it.


I think the oil rubbed hardware helped to bring the room together some. Now I would like to paint the walls, paint the medicine cabinet and vanity, clean the grout, and do something with the shower. You can see above that we have an angled ceiling in the shower. I bought that curtain and rings from the Dollar Tree about an hour before we were having an overnight guest...I haven't replaced it yet as I want to wait to spend my money on something I really love. I think most people with a shower like this get one of those rods shaped like an L so that it will fit. I feel like that makes the shower a lot smaller so I don't know. Having the regular rod at an angle has actually worked fine so far and I just hook the top curtain ring on the top of the rod so that it won't slide down. And I could hem a shower curtain to fit the space? We will have to see...

Monday, September 16, 2013

Pallet Coffee Table

Wood pallet projects were some of the first things that I started pinning on Pinterest back when I started two years ago. I loved all of the different things you could do with pallets that are usually free. I decided that I wanted to make a coffee table. It took me a while to find the right pallets. I usually see them in the trash so I collected for a while. I found two that were similar in size. One of them had more slats on the top then most so I thought that would be a good one for the top of the table. 

I made this table last summer when I was starting to rehab furniture. I don't have any process pictures but here is one before picture. I primed the coffee table the same time that I primed this dresser. When I am using oil based primer I like to do as much as possible while I have it out. I usually just throw the brush/roller away after using the primer.


I had to do some work before priming though. I borrowed a power washer and cleaned the two pallets off. Once Dry I sanded them. It was hard getting in all the cracks but I did that by hand and then used the power sander for the tops. Pallet wood is not in the best shape so it took a lot of sanding.

Priming was hard as well trying to get in all the cracks and crevices of the wood. I primarily used a foam brush for this step. After priming, I decided to use spray paint. I knew that although more expensive it would be a lot easier. My husband and I decided on orange. This was pretty much the first piece of furniture in our family room at the back of the house so we could pick anything we wanted.  I wanted something bright and bold so that's where orange came in. I bought six cans of spray paint. And it was sooo orange. After one can I decided that we got the wrong orange. It looked like a traffic cone. So I returned the other cans and bought a less bright orange. 

After painting my husband helped me to screw the two pallets together. It was very heavy after this step! We then added wheels that we bought at Ikea. They were $20 for four wheels. So with paint and the wheels this table was about $40 which is much less than buying a coffee table.

Finally, I coated the top and sides of the coffee table with polycrylic to protect the finish. And ta-da!  For $40 it is perfect for the space and unique which fits in with this quirky room. Well I don't know how unique pallet tables are according to Pinterest but they do become unique when you customize it to your space!


Friday, September 13, 2013

Styling DVD's

Having your DVD's on display can make a living/family room seem very man cave-ish. I bought my husband a DVD rack (from Amazon) before we got married which I should have put more thought into because it then came along with him to our house...It wasn't ugly but not a great piece of furniture.


So it sat in the corner of our living room all alone. Too small for the space and not really adding any interest to the room.
 Enter our built in bookcases. I had considered moving the DVD's onto the built-ins either on display or hidden in storage boxes. However once we built the bookcases we had this leftover shelf that used to hold my craft supplies (or attempt to hold). I really like this shelf from Ikea and it was only $20! Once we didn't need it in the office anymore we thought about moving it to the "garage" (the spare room we use for storage). However I liked it too much to just hide it in there and it was in perfect shape. So I decided to try it as a DVD shelf. We may eventually hide the DVD's for a more grown-up living room (when we are grown-ups?) but for now I like this solution.


I may center it on the wall at some point but since I am just testing it out for now I positioned it around the existing pictures. I think the key to incorporating your movies into your non man cave-ish room is to add some accessories for decor. I also stacked the movies in different directions to change it up some.


Yes we own all of The Fast and the Furious series. Don't judge.
I just used some accessories that I had around the house. I am running out of miscellaneous "stuff" now that I have two shelves in the living room and the built-in's in the office to fill... My favorite item is the movie reel from the library that I got for 50 cents at a yard sale!


And that is how I turned our movies into a decorative item in our living room. It works for now and it was a free solution so it doesn't have to be permanent. 

Thursday, September 12, 2013

Bookshelf to Media Console

We did not buy a TV for three whole months after we bought our house. It was painful. My husband and I watched movies on the laptop but no HGTV (we didn't have internet either). We waited to buy a TV till Thanksgiving week so we could get a good deal. Once we bought the TV we still needed something to put it on...We went to Ikea (of course) but I didn't really like any of the TV stands. For one, I was looking for something black to match our coffee and end tables (I know, too matchy-matchy...) and a lot of furniture at Ikea is "black-brown". I am picky. Finally I didn't like the height of some of the TV stands-most were too low for me. We had given up and were in the the warehouse area where we saw a display with the Expedit series bookcases which were still just getting popular two years ago. There are lots of different colors now (Umm I need the turquoise one!). You can see them everyone on Pinterest now. Apartment Therapy even has a list of different uses. At only $70 and in the right height and width we decided right away to get it! The options were white, birch, and black brown so we bought the white one.


In order to fit our DVD player and cable box we just excluded two of the shelves when putting it together. I thought about covering the back with fabric but have left it alone for now. We bought the two baskets (also at Ikea) and the top one holds the power strip and cords. They also now have doors you can add to the Expedit but those are about twice the price as a basket.

I rearrange the shelves occasionally. The A & P are from Hobby Lobby. The gold vases are my favorite Goodwill find. I don't know about you but in our area Target seems to donate their leftover items to Goodwill. These vases are from the Nate Berkus collection and would have cost $50 total from Target but only cost me $8! They still had the price tags on them.


The art over top of the TV is just scrapbook paper! I bought one of those big books filled with scrapbook paper on sale and picked out a few that I liked. It's not fancy but we can always upgrade later. 


Wednesday, September 11, 2013

Easy DIY Tray

I think that trays are an essential accessory to any room. You can use them for stylish and practical storage. Jewelry, remotes, books, or just for decoration. I have a yellow one on my credenza that I am using for decoration and a red one on my coffee table for remotes and coasters. 


I got the idea to make my own tray after pinning this project from My Blessed Life. I have since made several as gifts. I first bought a wooden tray from the craft store. They are at Hobby Lobby, Michael's and A.C. Moore for around $5. I bought mine with a coupon. I had all other supplies so my total cost for this project was $3.

It would have been quicker to spray paint but I used the same yellow paint that's in the office. I didn't prime it or anything just brushed it on. I have also used regular craft paint on other wood trays that I have made. After painting I used mod podge to add scrapbook paper on the inside of the tray. I had to use two pieces so I picked a piece from my collection that already had lines on it to make it less obvious. I put mod podge on the bottom and top of the paper and also put some over top the whole tray. 


My paper did get wrinkled in some spots so I was glad that I had a patterned piece of paper so you couldn't really tell. I think using card-stock instead of plain scrapbook paper would be better as it is thicker. Or maybe I shouldn't have used so much mod podge...

This was a great quick and easy project and is perfect because anyone can customize it to their own home.


Tuesday, September 10, 2013

Credenza-My Favorite Word

Yesterday I started the living room tour with the couch where I spend all my time...Today I would like to introduce you to the entry way which has my favorite piece of furniture (so far). The credenza!


Our front door opens right into the stairs and the living room. This wall by the stairs (and the door to our bedroom) was empty for almost two years. I knew that I wanted to get an entry way table but could not find one I really loved. I looked at a lot online but most I saw were pretty boring/standard and $100 plus. I pinned and pinned but didn't want to spend more than $100. I finally found this credenza at a yard sale in May this year and my entry way could finally come together! It is a credenza. Not an entry way table, buffet, console, sideboard or any of those lesser words. I like credenza better-it seems fancier. Pascal even calls it a credenza.

I had already started the gallery wall not too long after we moved in. It is obviously not done. I have just been adding to it slowly when I find a frame that I like and is a good price. I added scrapbook paper and fabric to some of the frames for extra color. Besides the tray and wine bottles, I also have a Nate Berkus lamp that matches my two white ones with a light teal Threshold lampshade (both from Target $40 total), and a small metal box for keys that my husband made in his welding class.


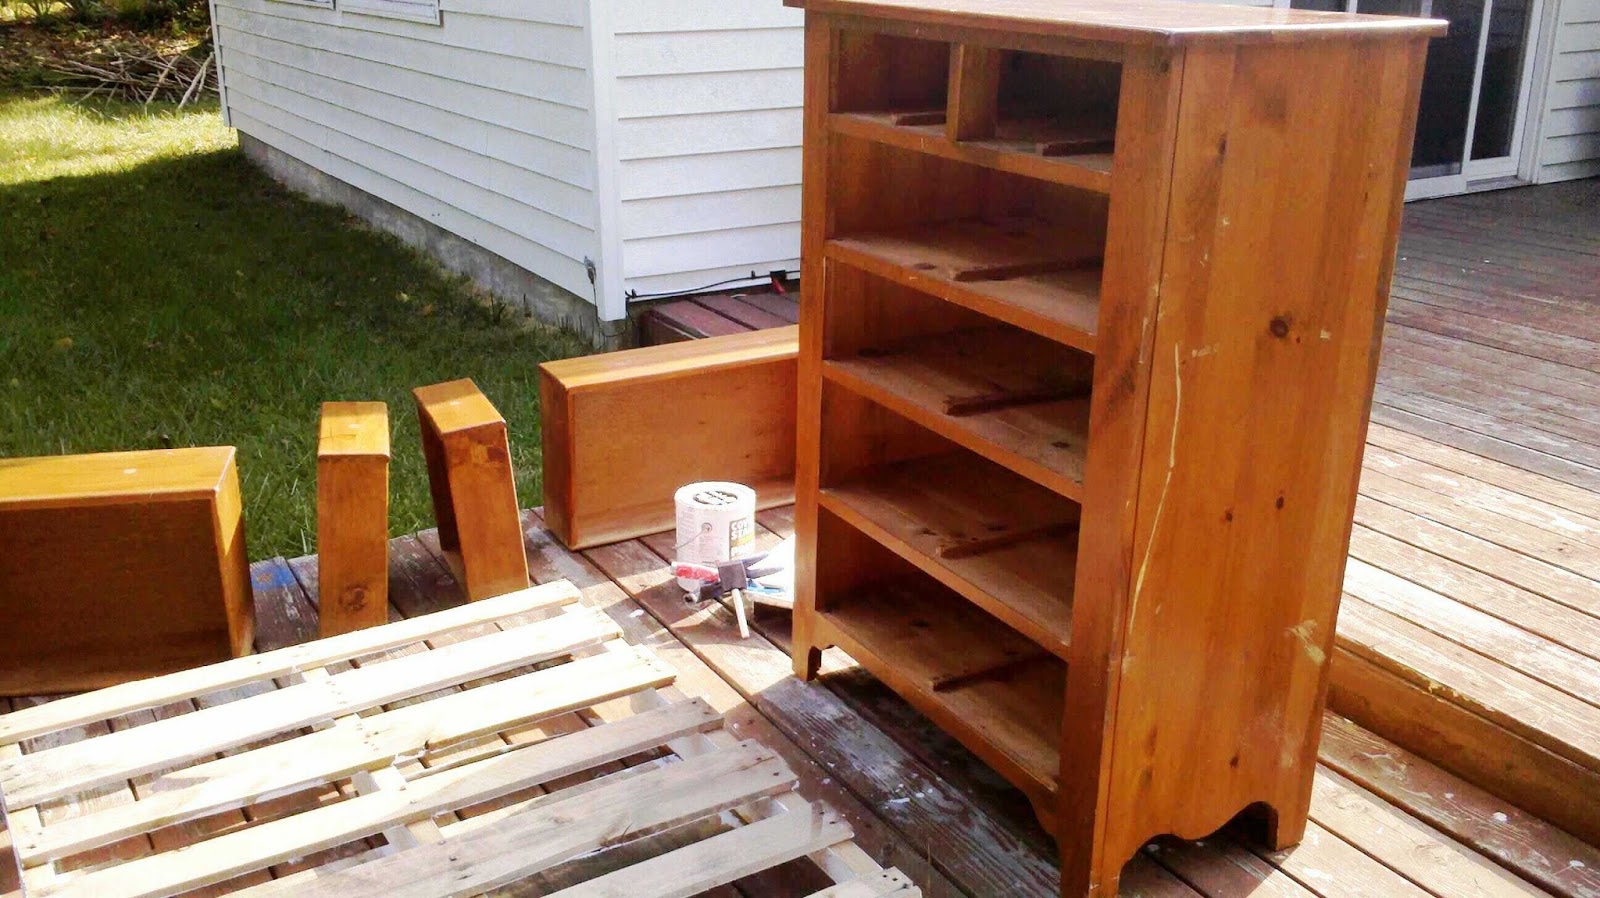
But back to the real star...the credenza. Here is the before picture...I am bad at remembering pictures so I had already started disassembling it when I remembered to take these with my phone.


I bought this at a yard sale for $35, which is my most expensive yard sale purchase. However I knew it was what I had been looking for for two years. So somehow I fit it in the back of my car and brought it home.

It was a nice cabinet to start with but not my style. The doors were in good condition and solid wood. The top and sides had some scratches. To start out I used some wood filler to smooth out the deeper scratches on the top and then sanded. I am not a good sander so I always have my husband check it as I tend to give up too quickly. After sanding I used the same process as with this dresser.

I took my time with this piece since I knew I would have it for a long time and that everyone would be able to see it right when they walked in my house. I rolled on the primer and used a small foam brush for the doors. The doors took foreveerrr to prime and paint. Thankfully once I was on the painting stage I was able to set up the doors in the living room and paint during a Bones marathon. I did two coats of the gray paint. It is actually the same paint that we used in our office, which is visible from the living room. It is Wet Pavement in a satin finish by Valspar. On the office walls it looks a bit darker. I think it is the perfect gray and actually looks gray-gray not blueish, purplish, or greenish.

After painting I waited a day and then applied polycrylic with a foam brush to protect the finish. I did two coats of this. I usually just do one on a lesser used piece. Before putting the poly on I did consider using a glaze, like I did with this table, to bring out the detail on the doors. I think that would look really great but for my room I decided I wanted more of a crisp clean look so I left it alone.

Finally we re-attached the hardware. I briefly considered replacing it and then was going to spray paint it. I am so glad I just left it alone! I think it works with the gray and I can always paint it later if I want. The credenza was actually missing one drawer knob when I bought it so I bought two new ones at the store and rotated the old and new. You can barely tell the difference. Buying those two knobs was my only cost besides the $35 as I had all the other supplies.


You can see in the back where the previous owner cut out a whole for their TV cables. Doesn't bother me but it could always be patched. I may paint the inside eventually and would also like to add a shelf for more storage. Yes those are all tea candles. Just stocked up on all the different scents at Ikea. 


After picture again! Love my credenza. And I love how paint can completely change the tone of a piece of furniture.