Our House

Our House

Friday, October 11, 2013

Upping My Upholstering Game

 I am almost did not survive the making of this chair. This post almost did not happen. Okay I am being dramatic. Well about the first part. I think it would be more accurate to say that the chair almost did not survive.

I have reupholstered many chair cushions at this point. You know, the kind where you unscrew it from the chair and then just staple. I've got that down. So it was about time for me to try something different. I don't know how soon I would do it again but I got it done.

It all started with the below $5 garage sale chair. I actually got it at the same place where my sister later bought this $5 desk at the family's second garage sale. The chair was actually sitting at my sister's future desk when I bought it but I didn't get the desk because at that time they were asking $40!!! for it.


The seat of the chair was very faded but the top part wasn't as bad. And the top was the part that would be hard to change. So I momentarily considered trying to keep the top fabric and just changing the bottom. Since that would be easier. Buttt that would be cheating and my husband pointed out that it was ugly haha.

So the project began. I actually bought this chair in May I think and it sat in our spare room until September when I started. The actual painting and seat part I got done quickly and then it sat until last week when I finally got enough courage to reupholster the chair back. Warning I took a lot of pictures. I am overcompensating for all the projects that I took hardly any pictures of. 

My first step was deciding where I wanted to use the chair and what to do about painting. I decided  to put it in our living room and paint it black. Black seemed like the obvious and boring choice but I figured I could do a pop of color with the fabric. I decided to use spray paint since it was a small surface and would be a lot easier with all of the details. Most spray paints have primer included but I went ahead and got a separate spray primer to just be extra safe. I used less than 1 can of the primer and 1.5 cans of the black paint. I usually get glossy for spray paint but went with satin since I didn't want the wood to look too shiny. 

Here is the chair with the primer coat. Looks better already! So here is my first mistake...I didn't take the chair back fabric off first. I ended up having to touch the paint up later when I took it off because I scratched some of the paint and the fabric was covering some of the wood. 

This is my self proclaimed "spray painting deck" but I am trying to be more careful and actually put cardboard down...
 I did the black coat after letting the chair drive for a full day just to be safe. Recommendation: Wear gloves while painting. I don't know why I hate them so much but I always forget and then regret it later. When it ruins my nails.


While I let the black paint dry (for at least a day) I worked on the seat. I cut some batting out to size just for the top (I didn't want to wrap the batting all around and make the seat too wide). I did not take the old fabric off I just covered it. 


I picked out some yellow fabric that I already had. I had a fabric fashion show and made Pascal pick. I bought it on sale from Jo-Ann's figuring I would use it for something. I had 2 yards but only used half of it. I can't remember the price when I bought it, I think $10 or $13 a yard. 

Because of the pattern I had to be careful to center the fabric. After lining it up I only put one staple on each side to start to make sure it was centered. 


The next step was trying to get the top fabric off...First I pulled the trim off with a combination of a small pry bar and a small knife. This was the part where I scratched the paint...It was annoying but once I got a good grip I could pull big pieces off at a time. So.Many.Staples.

I was then able to just rip the fabric off. And I found a surprise. I guess there was a small foam cushion in between the fabric at some point and it had disintegrated ...And I got orange stuff all of over my floor. 


Getting all the staples out of the back was a challenge and this was about the time I started swearing (inside my head of course). I used small pliers to pull them out. It was frustrating and took a while. At the end I still had a couple left in there but not enough to get in the way. 


Once that was done I stapled the back piece of fabric on, being careful to center it. While I was stapling I just laid the chair down on the ground. 


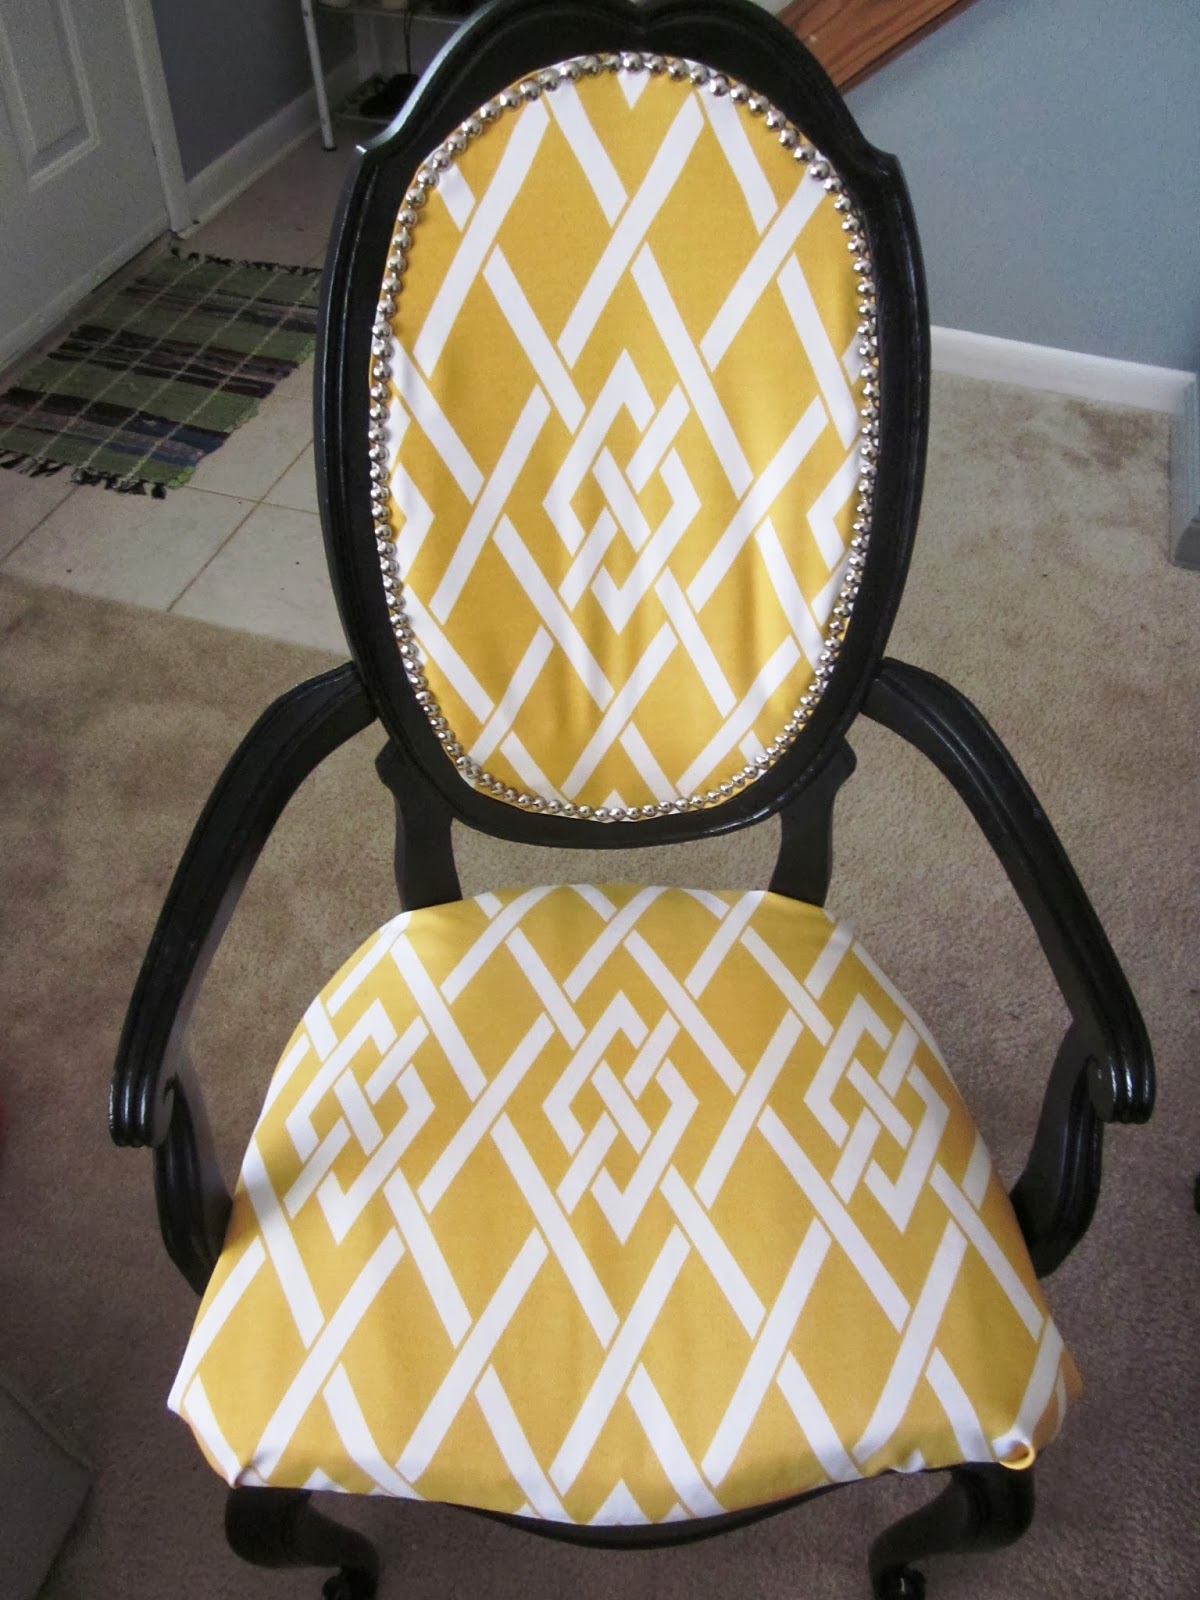
So the last step was what I was nervous about. Figuring out how to add the final piece of fabric with out any raw edges or staples showing...I was tempted to just glue the entire thing. I decided to use nail-head trim instead of fabric trim like was on the chair originally. So I needed there to be clean edges since the edges wouldn't be covered completely. I pretty much just made this up as I went along so this is definitely not professional. 

First I cut a piece of felt to use in between the fabric. I didn't use batting because I didn't want it to stick out too much and this chair isn't really for lounging/comfort...I bought this giant roll of felt for $1 at a garage sale! I traced it on the back of the chair and then cut it.... pretty simple so far.


I used spray adhesive just to keep the fabric secure, tight, and centered on the felt. I then used my hot glue gun to wrap the fabric around and attach it on the back. I did this so I could have somewhat clean/smooth edges instead of just cutting the fabric.


And finally the last step: nail-head trim! I ordered this trim from Amazon. It was $16 for 5 yards and I only used half of it. I guess I was a little confused about what it was until it actually came. I realized that it was already connected but not that you only actually nailed in every 5th nail. The rest were just "fake" nail-heads. At first I was disappointed and didn't think it would look good but once it was completed you could barely tell that they were attached and that some were fake. 


I needed Pascal's help with this part so there are no process pictures. It took longer than expected. I don't think Pascal wants to do it again (at least not with me). Sometimes DIY is not very relaxing... Basically I bent and shaped the pre-attached trim around and held it in place while Pascal nailed the nails in with a rubber mallet. I also stretched and tried to keep straight my fabric/felt creation underneath the trim. A lot of the nails went in crooked and had to be discarded. I hear that's pretty common with nail head trim in general. So although we have half of the trim left I don't think we actually have half of the nails left. The fabric ended up not perfectly tight and has some bumps in it but I think it was still worth it in the end.

Andd that was it. Finally my chair was complete! I don't think I will attempt this again for a while...Once I actually got going it didn't take that long so it could be done in a few days just so the paint has plenty of time to dry. After pictures!


And a before/after picture so you don't have to scroll up to see the before...


My total cost for this project was: $5 chair + $12 spray paint + $10 fabric + $8 trim = $35. Still much cheaper than buying a chair new plus this one has been personalized with my blood, sweat, and tears (all true, I cut myself trying to get the old staples out). Pascal says that it is very "fancy" which is a little different then our other furniture but it is good to mix things up.

Wednesday, October 9, 2013

My Version of a Fall Wreath

I have never really been a wreath person. I guess because a lot of wreaths that I have seen are old fashioned. However, now that Pinterest is around I see lots of fun wreaths for all year. I pinned this one by Cherished Bliss a while back because I really liked the texture with the popcorn kernels. I thought about using popcorn kernels to glue onto a letter "M" for the front door as I did the same thing last Christmas with red berries. I figured that would require less kernels than a whole wreath.

So I was semi-planning on buying a wood letter when I saw the below burlap canvas at Walmart for $5. I decided that I could just use the canvas to make my "M". I also picked up some black ribbon for a $1 and I already had the hot glue gun ($7 at A.C. Moore).


I first cut four pieces of black ribbon and laid them out to make a border. I originally just bought the ribbon to use to hang the "wreath" but I think the border helped. For the ribbon to hang it I measured out how long it should be for the "wreath" to be centered on the door and then stapled it to the back. 

Working hard...Don't mind the messy office. 

I had some popcorn kernels already because we have a hot air popper but they were pretty light in color and blended in too much with the burlap. I wasn't trying to leave the house at this point (already had pajamas on) and I am impatient so I wanted to get this project done. I also had microwave butter popcorn so I opened up a bag and washed the very buttery kernels off. They were much more yellow (because of the butter?) so I decided to use those. 

I drew a "M" with a sharpie to have some guidance and started by just gluing the kernels on the line. I then just kept adding kernels on until I ran out. I didn't want it to be too perfect. I might have burned myself a couple times. I might have a blister. 


After I was done there were lots of those hot glue strings all over that I just pulled off as best I could.


I have a love-hate relationship with hot glue guns

And that was it. It took about an hour for the whole project. I already had a wreath hook from my Christmas project last year so I used that. I did wonder if squirrels would try to eat it but I have a glass storm door so hopefully that keeps it safe. 


I am really happy with how it turned out! Maybe one day I will get enough courage up to actually make a real wreath but I love how much more seasonal my porch looks now with this easy project. 

Monday, October 7, 2013

Decorating With Fake Pumpkins

I was at Walmart last week (I know, I know) and I found these small fake pumpkins for 97 cents each. I don't have very many fall decorations so I decided to get them to paint. I like pumpkins since they work for October and November!


I bought every kind they had. They weren't terrible as is but I thought they would look a little classier in a uniform color. I was thinking about spray painting them gold or bronze but then I found some brown metallic craft paint that I already had so I decided just to use that. It took a little bit longer than spray paint but it was free since I already had it and it only took me an hour sitting on the couch watching X Factor.


It took three light coats with a small paint brush and I really like how the color turned out. Looks pretty good for $6! And I can always spray paint them a different color another year. 

I put them in a bowl I already owned ($7 at TJ Maxx) and attempted to arrange them decoratively.


So with a quick, fun, easy, and cheap update my house is finally starting to look a bit more fall-ish. 

Friday, October 4, 2013

A Post About Posts

When we moved in the exterior trim on our house was all the same faded blue- the doors, shutters, and the porch posts. And it all stayed the same until this spring when we finally painted the front door and updated the posts. The paint on the posts was particularly bad. I don't know if they were ever primed but they were flaking and peeling particularly the sides with the most sun exposure. I don't really have any before pictures but here is one that just so happens to be during one of our few snow storms. So I was really taking a picture of the snow not the porch...


You can't see any peeling paint but I just like this picture of our house in the snow so I am including it...


This porch project went through a couple phases and had its ups and downs. It first started with me trying to scrape the paint off so that we could repaint the original posts. I don't know if I have mentioned but I am terrible at sanding/scraping. Mostly because I give up too quickly. So I scraped the posts and then even primed one of them before my husband saw it. And it was very rough and bumpy. Not a good look. You can see in the below picture that one of the posts is white...It looks good from a distance.

Since the scraping didn't work that well I was then going to try power sanding. That was when my husband thought to use one of the lead paint tests that we had bought for an old antique door. So we did the quick test and found...that the blue paint was lead paint. So we really shouldn't be sanding it and creating dust that would not be good for us or the nearby plants. 

I like this picture because you can see my plants from last year growing back in :)
So the next thing that I tried was stripping the paint off with my gel Citristrip. That was an epic fail. It was a lot of surface to cover and I wasted a lot of the stripper. After applying it and then spending only about 15 minutes trying to scrape the paint off I gave up. It was going to take forever and I didn't like the original posts that much to work this hard to save them. That was when I suggested to Pascal that we cover (and thus seal up) the lead paint with wood which would also make the porch posts look sturdy, chunky, and modern. Although this option would cost more I thought it would be a big improvement to the porch. And would not require me to get rid of all the old paint. It would however require work from Pascal but he was on board after some convincing.


The post is white-ish from the dried stripping gel.
I took off these decorative pieces that were really not my style anyways. 


 We measured our posts and went to the hardware store. We needed 1x6x8's and 1x4x8's (two sides of the posts with 1x4's and two sides with 1x6's). We ended up buying the pressure treated wood. We looked at the pre-primed wood but that was significantly more expensive. We spent less than a $100 on the 16 pieces of wood. Now that we have already done it I would recommend spending the extra money on the pre-primed wood. It gives you a clean smooth surface and saves you the step of priming. Our posts are not completely smooth.

Pascal had to cut the wood some to fit with his table saw and then put up the 1x4's first. He used his brad nail gun to attach them and also added a couple of screws.


The 1x6's were added on the front and backs of the posts overlapping the 1x4's. So you can see lines between the two pieces of wood from the side but not the front and back. 

That is our old down spout that we also replaced
 First post done! Pascal works hard....goes to work and then comes home to work some more.


After putting up all the wood the next steps were priming, painting, and caulking all the cracks and gaps. Finished pictures coming next!

Wednesday, October 2, 2013

My Attempt at Gardening

 When we moved into our house two years ago our garden looked something like this...A bunch of weeds, a bunch of grass, and some miscellaneous flowers and bushes. I just wanted to start from scratch since I couldn't even tell what was a weed and what was supposed to be there. My grandmother actually got it started with digging some of it up (while my great aunt was helping to paint my bedroom-they're young).


The first spring in the house I finally got all of the plants up. It was a work out so I would say gardening is not exactly a leisurely activity...it requires work. I wonder how many calories you can burn gardening?

There were some plants on the left side of the porch as well but once I dug those up I just planted grass there. I can only manage one "finished" spot with plants for now. 


There was some plastic brick trim around the area as well that I dug up. You can see in the below picture that the grass around the sidewalk was very overgrown. Pascal took care of that with a square shovel and a weedwacker. 


We gained a lot of sidewalk, it was amazing. We still need to power-wash the sidewalk as it is stained where the grass was overgrown. 


The driveway had to be trimmed out as well. 


My grandmother helped me pick out some plants and I spent about $200 between flowers and the brick trim. Most of the plants that I bought are perennials so they will come back the next year (Shocker I didn't kill them-they all actually did come back this past summer!). I decided to buy the white brick trim as we had the same brick trim in red around the trees in the front yard. You can see some of it on the porch. There was an empty circle of brick in the yard that we pulled out. I guess there used to be a tree there and they took the tree out but never the brick?


The garden did pretty well this summer although right now it is pretty dead...I need some more fall plants. We just wanted flowers, not bushes, so it is pretty sad looking all winter. I will have another post on what we did with the terrible blue porch posts and a picture of the whole porch update soon!